To Build A Shelf In The Wall : Build Organize A Corner Shelving System A Beautiful Mess / All you need is a wood board and an old suede or leather belt.. Depending on the design and load bearing capacity of the shelf, you can either attach directly to drywall (with toggle bolts or other drywall fasteners), attach to wall studs (with lag bolts), or a combination of the two. Be sure to use a speed square to make sure everything remains square as you attach. This time, add two sets more bricks on top to make a pillar. Floating shelves are a lively, unique addition to living rooms, bedrooms, hallways, or any place where a special accent is needed. The idea behind this shelf is very simple:
Floating shelves are a lively, unique addition to living rooms, bedrooms, hallways, or any place where a special accent is needed. Place the 1″ x 2″ piece along the mark you made. Next, these frames have been covered solid using extra wooden slabs and lengths resulting in fantastic floating shelves! Use a standard tape measure or a laser tape measure for more precise results. You'll place the first shelf board onto the base bricks.
Siimusti Algkooli Digikiirendi Protsess Download 27 Design Diy Wall Shelf Ideas from cdn.itsoverflowing.com Measure and mark the lumber for the two side shelves, four wall cleats for the side shelves, closet rod and top shelf (image 1). Line up the 2x4s to the edge of the drywall opening. Run a pattern bigger than the perimeter of the desired shelving, by at least 12 inches on all sides. If the unit is heavy, attach 2x4s to the existing framing to add extra support in which you can nail the shelving unit onto. This time, add two sets more bricks on top to make a pillar. Prime and paint all wood parts after cutting (image 3). Continue to 2 of 30 below. Locate studs with a stud finder.
The idea behind this shelf is very simple:
Use a standard tape measure or a laser tape measure for more precise results. You'll place the first shelf board onto the base bricks. Be sure to use a speed square to make sure everything remains square as you attach. Floating shelves are a lively, unique addition to living rooms, bedrooms, hallways, or any place where a special accent is needed. If the unit is fairly light, slip strips of plywood behind the drywall, lined up with the edges of the hole. Build a set of library shelves from the wall. Use your stud finder to locate wall studs where the line is and mark those on the wall. The suggestion made in one comment of building the shelves as a unit, then installing is a neat variation. If the unit is heavy, attach 2x4s to the existing framing to add extra support in which you can nail the shelving unit onto. Cut the side shelves, wall cleats for the side shelves, closet rod and top shelf (image 2). Attach the parts of the large square shelves to the center boards and build the squares. Secure these to the drywall with screws. There are lots of ways to put a simple shelf on the wall.
Floating shelves are strong enough to display most of your favorite treasures. We patched the holes and painted the the pantry, then began installing our wall braces. This time, add two sets more bricks on top to make a pillar. If the unit is fairly light, slip strips of plywood behind the drywall, lined up with the edges of the hole. Don't have a nook to fit your built in shelves into?
How To Build A Plank Wall With Shelving Thistlewood Farms from cdn.shortpixel.ai Floating shelves are a lively, unique addition to living rooms, bedrooms, hallways, or any place where a special accent is needed. After making the marks on the walls where you want the shelves to be, use one of the 1″ x 2″ strips you cut and place it on the mark, then draw a line under the piece. Use your stud finder to locate wall studs where the line is and mark those on the wall. Next, these frames have been covered solid using extra wooden slabs and lengths resulting in fantastic floating shelves! Run a pattern bigger than the perimeter of the desired shelving, by at least 12 inches on all sides. Angle the edges inward at 45 degrees to prevent the cutout from falling inside the wall. Youtuber the carpenter's daughter did just that, and she advocates for using sturdy brackets to keep the shelves from breaking under the pressure of your stuff. These shelves would also work great in a bathroom behind the door and could be made deeper wherever they are used.
Gain extra storage inside the walls!
Excise the larger panels for each shelf with straight edges. To install the wall braces, you'll need to find the studs in your wall(s) and mark their location. To do this, choose a small section (3 x 3 inches) of wall between studs where you want your shelf to go. Attach the parts of the large square shelves to the center boards and build the squares. I like to place the shelf before nailing the second brace to make sure that the shelf is level because sometimes the floor is unlevel.if the shelf is not level, adjust the second brace until the board is level. Angle the edges inward at 45 degrees to prevent the cutout from falling inside the wall. The suggestion made in one comment of building the shelves as a unit, then installing is a neat variation. These shelves would also work great in a bathroom behind the door and could be made deeper wherever they are used. Secure these to the drywall with screws. I chose to use mdf to built the shelves for a couple of reasons: Youtuber the carpenter's daughter did just that, and she advocates for using sturdy brackets to keep the shelves from breaking under the pressure of your stuff. Measure and mark the lumber for the two side shelves, four wall cleats for the side shelves, closet rod and top shelf (image 1). Locate studs with a stud finder.
Floating shelves are a lively, unique addition to living rooms, bedrooms, hallways, or any place where a special accent is needed. Build a set of library shelves from the wall. I'll show you how to build recessed bathroom shelves or a wall niche in between the studs. This belt shelf from ronja, the blogger behind nur noch, is a smart idea that's cheap and easy to create. If the unit is fairly light, slip strips of plywood behind the drywall, lined up with the edges of the hole.
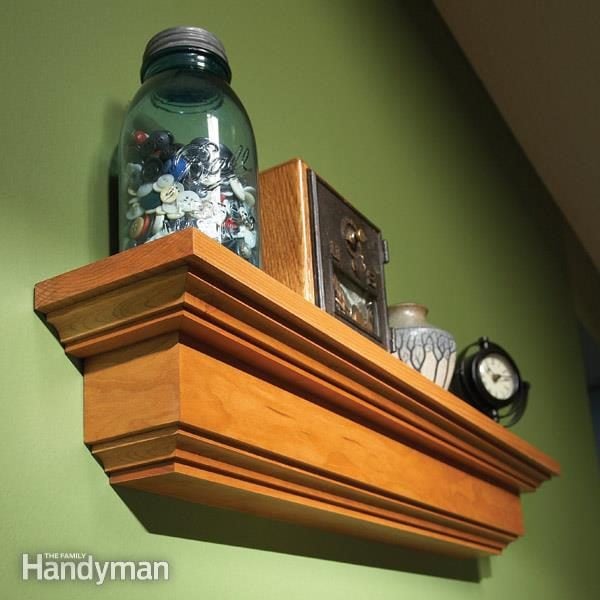
How To Build A Wall Shelf Diy from www.familyhandyman.com Angle the edges inward at 45 degrees to prevent the cutout from falling inside the wall. Next, these frames have been covered solid using extra wooden slabs and lengths resulting in fantastic floating shelves! Attach the 1x4 boards to the shelf to make the small square shelves using the pocket hole screws and wood glue. Band and the cove moldings extra long. If the unit is heavy, attach 2x4s to the existing framing to add extra support in which you can nail the shelving unit onto. Run a stud finder along the wall in the desired area of your shelving. Prime and paint all wood parts after cutting (image 3). Excise the larger panels for each shelf with straight edges.
I'll show you how to build recessed bathroom shelves or a wall niche in between the studs.
Prime and paint all wood parts after cutting (image 3). Locate studs with a stud finder. Make an inspection hole to ensure your placement is not interfering with electrical, hvac, or plumbing. Follow the instructions for the basic shelf unit for cutting the holes in the drywall and building the two cabinet boxes. Use your stud finder to locate wall studs where the line is and mark those on the wall. There are lots of ways to put a simple shelf on the wall. We patched the holes and painted the the pantry, then began installing our wall braces. I'll show you how to build recessed bathroom shelves or a wall niche in between the studs. Using some 1/2 osb and some 2x3s i made 3 shelves for my shed. To install the wall braces, you'll need to find the studs in your wall(s) and mark their location. Depending on the design and load bearing capacity of the shelf, you can either attach directly to drywall (with toggle bolts or other drywall fasteners), attach to wall studs (with lag bolts), or a combination of the two. Build a set of library shelves out from the wall. This belt shelf from ronja, the blogger behind nur noch, is a smart idea that's cheap and easy to create.